I can’t be the only one who sings the Frozen song in my head, can I? Yet Olaf is what comes to mind whenever I hear the word “snowman.” But I digress…today we’re going to learn how to build the perfect snowman! Before we get into the instructions (which are pretty straightforward), let’s discuss a couple of keys to creating your frozen friend.
Snow Matters
Well, obviously you need snow, or else you can’t build a snowman, right? Well, sort of–warm weather climate residents, we’ll discuss your options shortly! But it’s the type of snow that matters and makes a difference when it comes to making a solid snowman. Those of you who live in areas that receive regular snowfall probably know the difference:
- There’s the powdery snow, which is very pretty but serves no other real purpose.
- There’s the frozen snow (yes, it’s essentially ice), the kind that you can almost walk on top of without sinking and that hurts very badly when your friend or sibling throws it at you.
- And there’s the nearly frozen snow, the type that you can work nicely into a quality snowball to throw at your friend or sibling as a small measure of revenge. This is the snow you want to use.
Location, Location, Location
Where you decide to build your snowman is important. For starters, do you want curb appeal, where neighbors stroll by and marvel at your snowman-making abilities? Or do you want to protect your snow buddy from certain doom at the hands of neighborhood kids?
Also important to consider for location is where there is plenty of snow to use and how much sun hits that area each day. If you settle for a spot where there are mounds of snow, you won’t have to worry about shoveling more snow to that spot from other areas in the yard. And if you want your very own Frosty to make it through a few days upright, it’s a good idea to build him/her somewhere shady or a spot that doesn’t receive full sunlight. Otherwise you’ll have a melted puddle of a friend quicker than you can sing Frosty’s song.
Time to Build!
OK, now that you’ve got the right location and you know whether the snow you’re using is good snowman-making snow, you’re ready to roll! Literally.
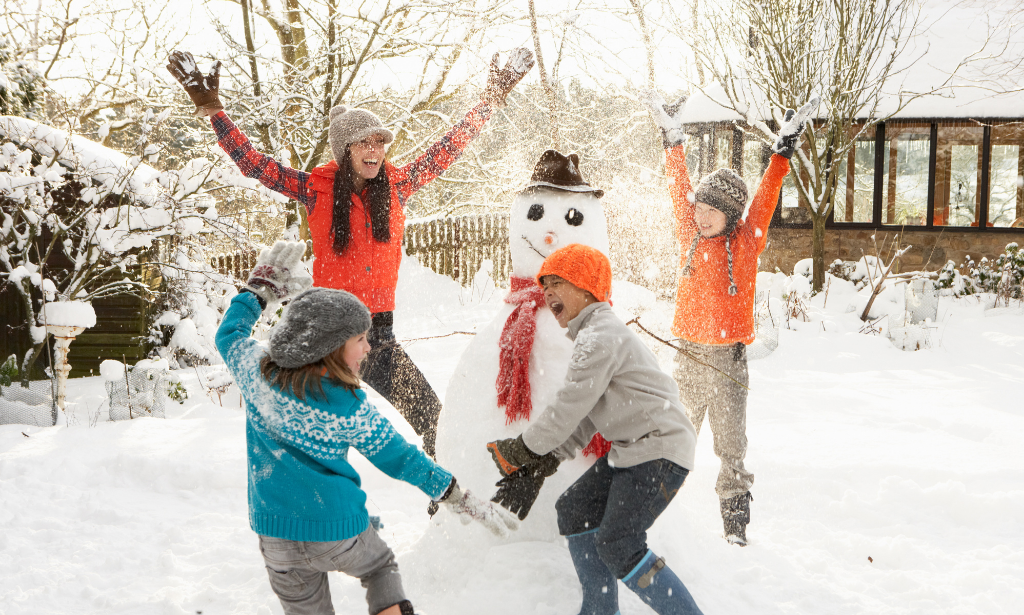
- Step 1: Start with a snowball and push it around in the snow until it starts getting bigger. Feel free to gather more snow and pack it onto the ball so it grows a little bit faster. Once you have about a bowling ball-sized snowball, then you can really start rolling that around the yard and getting it to grow quickly. Depending on how big you want your snowman, keep pushing that snowball until it’s large enough to rest another large snowball on top. Repeat for the middle ball, making it a little bit smaller than the bottom ball. Lift the middle ball and place it atop the bottom–you might need a friend to help. [Pro tip: to help stabilize the middle (and top) balls, wedge some loose snow into the area where the base of the middle rests on the bottom.] Finally, repeat for the head, making the smallest snowball of the three. Now you’ve got your snowman body!
- Step 2: Your snowman needs arms, so track down some tree branches or thin pieces of wood (or anything else that resembles arms!), and stick them into the sides of the middle snowball. Be careful not to push them in too far or too forcefully, as the snowball could crack and fall apart.
- Step 3: Time for the face! Most people don’t have buckets of coal lying around, so get creative with the eyes. A couple of medium-sized rocks or even pinecones can serve as eyes, though you may need to scrape out some snow from the head in order to stick them in. Again, be careful not to go too far. The nose? Easy–a carrot! If you don’t have any carrots around though, anything long and pointy will do, like maybe a pencil or marker. Or, forget tradition and give your snowman a short and stubby nose! Finally, for the mouth, you can use whatever you’d like–a row of chocolate chips, pebbles, a licorice rope. The sky’s the limit!
- Step 4: A snowman needs accessories, doesn’t he? Find a fun hat and an extra scarf and dress him up! You can even give him sunglasses, a crown, a lei, or anything else you might have on hand. Most traditional snowmen have buttons down the front, but I’m not entirely sure what those buttons are holding together–it’s not like snowmen are wearing shirts or coats (though they could!).
And there you have it…the perfect snowman!
Bonus: How to Build a Warm-Weather Snowman
Those of you who don’t have the pleasure of living in a climate where the high temperatures can sometimes reach 12 degrees and where shoveling sidewalks and removing ice from your windshield are legitimate forms of exercise should still be able to experience the fun of building a snowman. So, here are a few alternatives…
- Build a…sandman? Hey, if you don’t have snow, you’ve got to find something, right? If you live near a beach, you’re in luck! Simply set up camp near the water, where the sand is wet–but not too wet! If the sand is too wet, then you’re dealing with a goopy mess of mud that will just drip all over the place. You want that damp/moist sand that you can pack together. Once you’ve found the right sand, just follow the steps above!
- A Play-Doh man! OK, if you’re going to use Play-Doh, you’ll have to scale down the size quite a bit. Unless you plan on raiding a Play-Doh factory. Even when making a mini Doh-man (clever, huh?), you can still have fun with colors and accessories. And the best part? He’ll never melt!
- Get crafty! If you like the idea of a smaller, non-melting snowman, there are tons of craft ideas you can use for inspiration. Using everything from chopped wood to coffee filters, this list offers 13 fun ways to build a snowman, minus the snow!
So, there you have it! Building an awesome snowman doesn’t really require much skill–all it really takes is some creativity and imagination. If there’s snow on the ground, grab a friend or two, a sibling, or even Mom or Dad and get building! And if you don’t have snow, enjoy the warmth while you create something fun. That’s Today’s Lesson! Subscribe to our blog for more fun lesson ideas and creative homeschooling tips and tricks!